
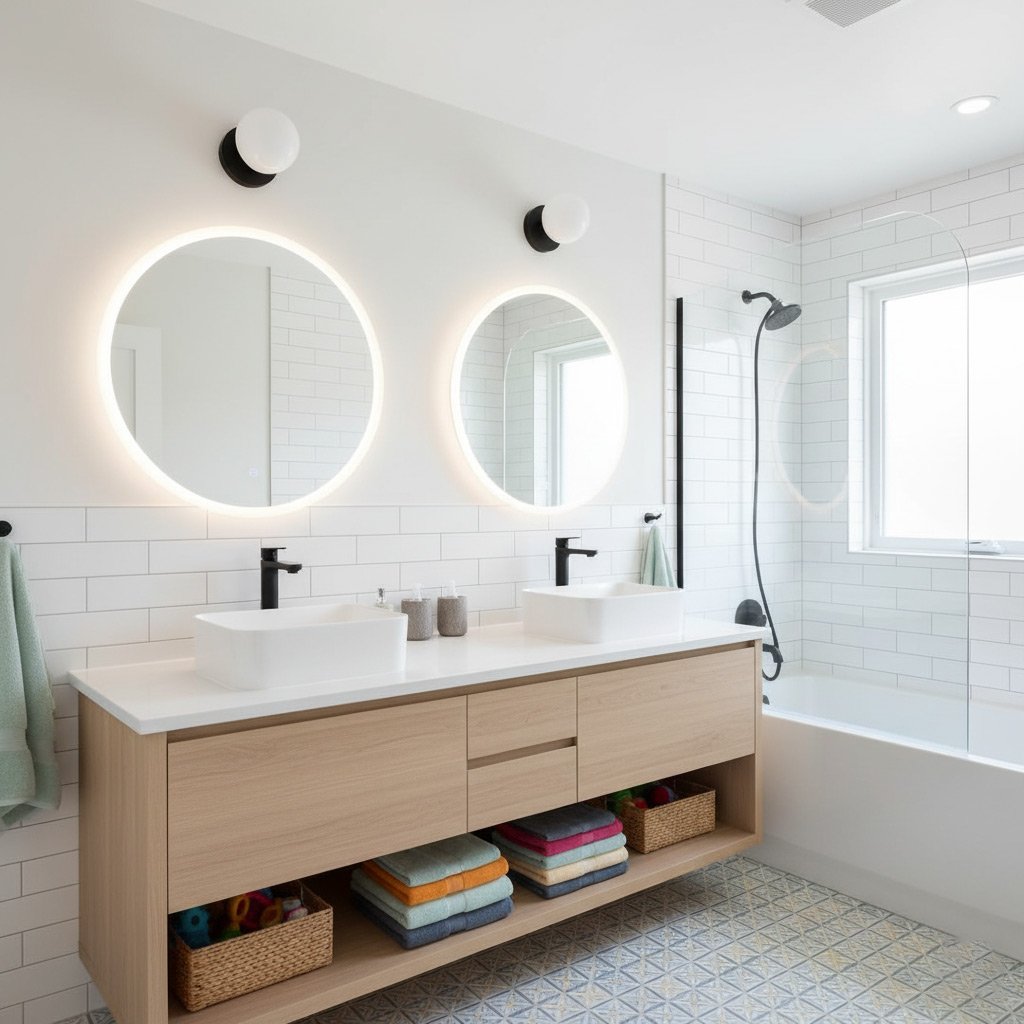
Picture this: you pull the shower curtain aside and are greeted by a modern, glass‑walled shower that feels like a spa retreat, right in your Sacramento home. No more stepping over a bulky tub or wrestling with slippery surfaces – just a clean, open space that makes every morning feel like a fresh start.
Homeowners across the valley are swapping tubs for showers to slash water bills, boost curb appeal, and free up precious floor space. The trick isn’t just about ripping out the old fixture; it’s about planning the layout, choosing the right waterproofing, and picking materials that stand up to our hot‑summer heat and winter rains.
In the next few minutes you’ll discover the exact steps, hidden costs to watch for, and the little‑known shortcuts that pros use to finish the job on time and under budget – so keep reading and turn that outdated tub into a show‑stopping shower.

Assessing Your Space and Budget: Key Considerations for Sacramento Homes
Measure Twice, Cut Once
Start by pulling out a tape measure and sketching the existing bathroom footprint. Note the distance from the vanity to the tub, the height of the ceiling, and any door swings that could clash with a new shower enclosure. Even a half‑inch miscalculation can force you to redesign the whole layout.
Budget Blueprint
Next, line up the numbers before you swing a hammer. A typical tub‑to‑shower conversion in Sacramento runs between $7,000 and $12,000, but the final price hinges on three main factors:
- Materials: premium tile, tempered glass, and high‑grade waterproofing add up fast.
- Plumbing work: relocating drains or moving the water supply can double labor costs.
- Permits & inspections: the city of Sacramento requires a permit for any structural change, and the fee varies by neighborhood.
Set a contingency fund of at least 10 % to cover surprise expenses like hidden rot or outdated wiring. Knowing where the money goes keeps the project from stalling halfway through.
Designing the Perfect Shower Layout: Size, Drain Placement, and Accessibility
Get the dimensions right the first time
Measure the footprint of your old tub and add a few inches on each side – a 36‑inch wide shower feels spacious, while a 30‑inch version still leaves room to move. Don’t let a cramped box ruin the vibe; aim for at least 5‑foot of length if you enjoy a long, lazy rinse.
Keep the ceiling height in mind. If your bathroom has a low ceiling, a glass panel that stops at shoulder height will keep the space feeling open without sacrificing privacy.
Drain placement that actually works
Where the water disappears matters more than you think. A linear drain along the back wall gives a sleek look and speeds up drying, while a center point drain is easier to retrofit on older homes.
- Slope the floor at 1/4 inch per foot toward the drain – no shortcuts.
- Make sure the drain is at least 2 inches larger than the pipe to avoid clogs.
- Consider a waterproof membrane that extends 6 inches beyond the shower perimeter.
Accessibility without sacrificing style
Think about who will use the shower. A low threshold or a curbless entry eliminates the “step‑in” barrier and looks modern.
Install a built‑in bench or a fold‑down seat for comfort, and add grab bars that blend with the tile rather than scream “hospital.” These touches keep the space safe and chic.
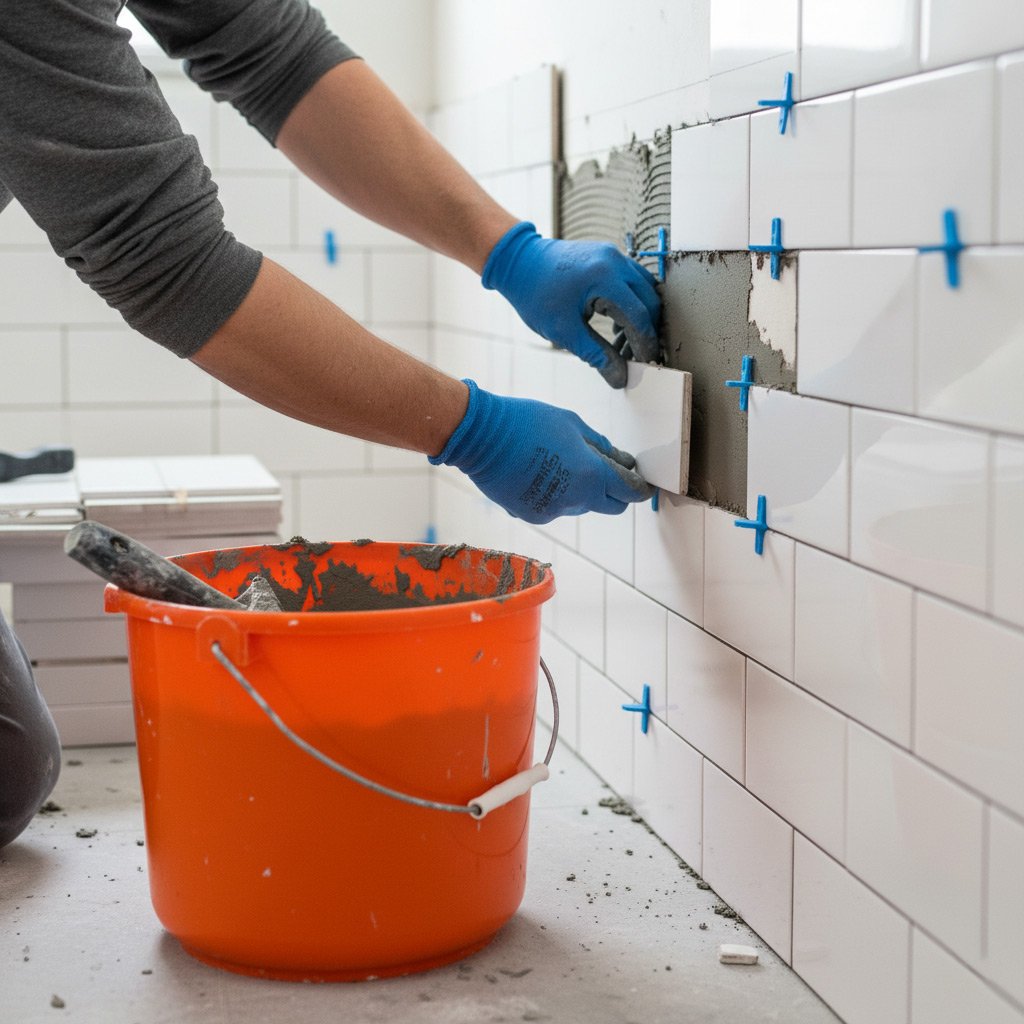
Selecting Materials That Withstand Sacramento’s Climate: Tiles, Glass, and Waterproofing
Tiles that Beat the Heat and the Rain
Sacramento summers can scorch a poorly chosen floor, while winter storms demand a slip‑resistant surface. Pick porcelain or natural stone with a low water absorption rate and a textured finish to keep feet steady.
- Porcelain: dense, frost‑proof, and easy to seal.
- Quarry tile: rugged, absorbs less heat, perfect for a spa‑like feel.
- Slip‑rated ceramic: budget‑friendly, but choose a matte glaze.
Don’t forget the grout – a polymer‑enhanced mix resists cracking when the temperature swings.
Glass That Stands Up to Sun and Storm
Clear, tempered glass is a must, but Sacramento’s UV punch can yellow cheap panels. Go for low‑iron, tempered glass with a protective coating; it stays crystal clear year after year.
- Frameless panels: sleek look, easier to seal.
- Framed glass with aluminum or stainless steel: adds rigidity for high‑traffic homes.
- Anti‑condensation treatment: cuts fog, saves you wiping.
Install a drain‑ready sweep at the base to guide water straight to the floor drain.
Waterproofing That Won’t Leak Into Your Basement
The secret to a leak‑free conversion is a two‑step membrane system. First, a liquid‑applied waterproofing coat seals every nook, then a sheet membrane provides a robust barrier.
- Liquid rubber (e.g., Sika®) – flows into cracks, cures flexible.
- Sheet PVC or CPE – adds strength, especially around the shower curb.
- Sealant tape at pipe penetrations – prevents hidden seepage.
Finish with a cure time of at least 24 hours before tiling, and you’ll avoid the dreaded “wet wall” surprise.
Plumbing and Drainage: Reconfiguring Pipes Efficiently for a Tub‑to‑Shower Conversion
Map the Existing Layout
First, pull the floor panel and trace the current tub’s drain back to the main stack. Know where the waste line sits before you start cutting. Most Sacramento homes built before 2000 use 2‑inch PVC; newer builds may have 1½‑inch ABS. Mark the pipe’s centerline with a chalk line – it saves you from guessing later.
Resize the Drain for a Faster Flow
A shower needs a steeper slope than a tub. Aim for a ¼‑inch drop per foot of pipe run. If the existing pipe is too shallow, replace the section with a new 2‑inch PVC that can handle the increased velocity. This prevents clogs and keeps the water moving.
- Use a pipe cutter, not a hacksaw – cleaner edge, less friction.
- Apply primer and cement in two quick strokes; the joint sets in minutes.
- Test the slope with a level before the cement cures.
Vent the System Properly
Every shower must have a vent to avoid suction that pulls water out of the trap. In most Sacramento basements, the vent can tie into the existing bathroom vent line. If the distance is over 6 feet, add a dedicated vent pipe that rises at least 12 inches above the roof line.
Don’t forget the air admittance valve if you can’t run a vent to the roof. It’s a cheap, code‑approved shortcut that keeps the trap sealed while letting air in.
Hidden Costs and Permitting: What Sacramento Homeowners Must Know
Permit paperwork you can’t ignore
Before you swing a hammer, the City of Sacramento will ask for a building permit. It’s not a suggestion; it’s a rule. The fee usually runs $150‑$300, but if your project touches plumbing or electrical, expect an extra $200‑$400.
Missing a permit can bite you later—think fines, forced re‑work, or a failed home inspection. Keep a copy of every approved plan in a safe spot; the inspector will want to see it.
Surprise line‑item costs
Most homeowners budget for tile, shower doors, and labor, but a few hidden expenses creep in.
- Waterproofing membrane upgrades – older homes often need a higher‑grade membrane, adding $500‑$800.
- Re‑routing existing drain lines – a 90‑degree turn can cost $300‑$600.
- Structural reinforcement – if the floor joists were designed for a tub’s weight, you may need extra bracing, $400‑$900.
- Disposal fees – hauling out a cast‑iron tub isn’t free; expect $150‑$250.
Timing tricks that save cash
Plan your inspection dates early. A missed inspection means you wait weeks, and labor rates climb. Schedule the final inspection right after the waterproofing cure; you avoid paying for extra days on the crew.
Ask your contractor for a written “all‑in‑one” quote that lists permits, disposal, and any contingency. That way you won’t be blindsided when the bill arrives.
Case Study: Transforming a 1970s Ranch‑Style Bathroom in East Sacramento
Before the Conversion
The original bathroom was a time capsule: a faded pink bathtub, cracked linoleum, and a single‑pane shower curtain that barely kept water off the floor. Space was at a premium, and the homeowner complained about a constant drip that turned the room into a mini‑pool each night.
The Process
Our crew tackled the job in three swift phases, keeping the budget tight and the timeline short.
- Demo & layout: ripped out the tub, exposed the studs, and mapped a new shower footprint that maximized floor area.
- Plumbing re‑route: moved the drain 18 inches toward the wall, installed a linear drain for a sleek look, and added a pressure‑balanced valve.
- Waterproofing & finishes: applied a 3‑coat cement board system, chose a heat‑resistant porcelain tile, and sealed a frameless glass wall with low‑iron glass.
Results That Speak for Themselves
The homeowner now enjoys a spacious, slip‑free shower that feels like a boutique spa. Water usage dropped 30 %, and a recent appraisal added $12,000 to the home’s value—proof that a smart tub‑to‑shower swap pays off fast.
Final Words
Ready to turn that old tub into a sleek, spa‑like shower? The first move is simple: grab a pen, sketch the space, and set a realistic budget. Don’t wait for perfection—start with what you have and refine as you go.
What to Do Next
- Measure the floor and ceiling height twice.
- Contact a licensed plumber for a quick pipe audit.
- Choose waterproof tile that can handle Sacramento’s heat swings.
- Schedule a permit check with the city planning office.
When you’re ready to bring in the heavy hitters, Tub to Shower Conversions specialists are just a call away. They’ll handle the demolition, the drywall, the grout, and the final polish so you can enjoy that glass‑walled shower without lifting a finger.
People Also Ask
What is the average cost of a tub‑to‑shower conversion in Sacramento?
The typical price ranges from $4,500 to $9,000, depending on the size of the bathroom, material choices, and any necessary plumbing rework. Labor costs in Sacramento tend to be higher than the national average, so budgeting for professional installation is essential.Do I need a permit for a tub‑to‑shower conversion in Sacramento?
Yes, most cities in Sacramento County require a building permit for any major bathroom remodel, including tub‑to‑shower conversions. Obtaining the permit ensures the work meets local codes for waterproofing, drainage, and accessibility.Can I keep my existing bathtub plumbing when converting to a shower?
In many cases, the existing drain and water supply can be reused, but the pipe layout often needs adjustment to accommodate a new shower valve and proper slope for the drain. A licensed plumber can assess whether the current plumbing meets code for a safe conversion.What tile materials are best for Sacramento’s climate?
Porcelain and natural stone tiles with low porosity are ideal because they resist moisture and temperature fluctuations common in Sacramento’s hot summers and cool winters. Pair them with a high‑quality waterproof membrane to prevent water damage.How can I make my new shower accessible for all ages?
Incorporate a curbless (walk‑in) design, install grab bars, and choose a low‑threshold shower pan. These features improve safety for seniors, children, and anyone with limited mobility while complying with California accessibility guidelines.Sacramento Bathroom Remodel brings over 15 years of residential bathroom renovation expertise to the Sacramento area. Their team combines skilled craftsmanship with a deep understanding of local design trends, delivering personalized remodels that enhance both function and style. Committed to reliable service and transparent communication, they help homeowners transform their spaces with confidence.
Need Bathroom Remodel?
We transform Sacramento bathrooms into functional, modern spaces in days, not weeks, serving ZIPs 95814, 95815, 95661, 95765, 95630. Our streamlined process minimizes disruption while delivering lasting quality.
Get Remodel Estimate